First off, Merry Christmas to all our readers!!
If you’ve been spoiled this Christmas, and received a shiny new tablet as a present, you may have already gone out and bought a hardy cover to keep it protected. However, for those who have yet to decide on which cover to buy, or were shocked at the asking price for them, take a look at these cute and functional DIY tips on making your own tablet cases – with a very inexpensive idea for a DIY tablet stand at the end.
Tip: Before you start picking out your fabric, ensure whatever you choose is soft, as this is what’s going to be pressing up against your screen day after day – and you don’t want scratches!
")
1. An Old Book
Those who love reading will get a kick out of creating a robust cover for their latest gadget, made out of an old (or new) book.
Materials:
A book slightly larger than your tablet
A pencil or marker
Crafts knife
Glue
Soft fabric
Elastic or a stretchy fabric strip
Directions: Open the book and use the pencil or marker to trace around your tablet on the top page. Use the crafts knife to carefully cut out the chunk of pages within the book, carefully following the tracing. Once you’re done cutting, check that the tablet fits snuggly inside the book – and cut away more pages if it doesn’t. Once the tablet fits inside without hitches, remove it and then use glue to paste the edges of the pages you’ve cut together. Cut the soft fabric to fit inside the box shape you’ve made, and glue it inside so your tablet has a cosy interior. Now, cut the elastic or stretchy fabric into four pieces, to glue them to the interior four corners of the book to hold your tablet in place. Leave it to dry.
")
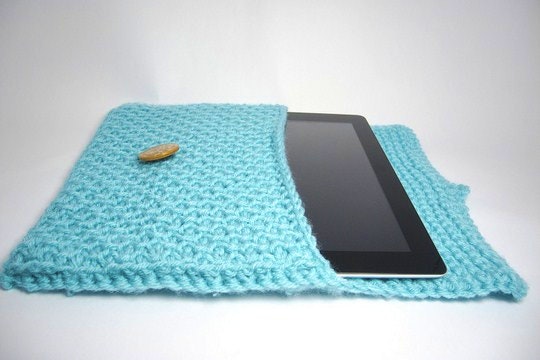
2. A sleeve
With the prices on sleeves ranging from affordable to ridiculous, why not take matters into your own hands and create a simple, stylish sleeve of your own:
Materials:
Felt
Colourful fabric
Ruler or measuring tape
Pencil or marker
Cardboard box
Sewing Kit
Scissors
Optional: Two buttons or Velcro
Directions: Measure your tablet and trace it out twice (trace it, and then place the tablet next to the first tracing, to trace again) on the felt with your pencil, so you end up with an oblong book-shape – this is going to be your inner lining. Cut this out, and use it as a stencil for the colourful fabric, cutting it into the same book-shape, but leaving some extra material on the top to allow space for your tablet. Next, cut the cardboard into the shape of your tablet, and then sew (or staple) the felt onto this. Sew the cardboard-backed felt (with the cardboard facing down) onto the colourful fabric. Fold the top and bottom edges of the fabric down (they should just reach, or just cover the top of the cardboard fabric). Check your tablet is protected from the front and back by the cardboard. Now, to use photographic terms, sew both landscape edges shut, and one end of the portrait sides. You now have a handy sleeve case for your tablet.
Optional: If you like, you can optionally sew an envelope flap onto the open end of the case, and then sew a button onto the triangle side, and another just below it on the actual case (or just use Velcro on both ends to secure it). Get some ribbon or an elastic band to place between the two buttons and it’ll now stay closed.
")
3. Tablet Stand
So now you’ve got your cover, but what about those useful stands they’re selling, or covers and stands that are combined? Well if you’re not too fussy about how your stand looks, then here’s a very easy and quick solution:
Materials:
A 50 pack C.D Spindle stand
Directions: Find an empty CD spindle to be a stand for your tablet of choice. If you’d like to see how it works, visit this link to watch the youtube video.
Let us know of any other tips and tricks you’ve done or know of, to make protectors and stands for your tablet.
Main image courtesy of dani0010 (Flickr)